FreshnCrunchy

Delicious, Fun & Healthy Food

gluten-free

Strawberry & Chocolate Ice Cream Cups (Raw)

Raw Dessert, DessertLina LiwagComment

Strawberries and chocolates.  This combo is seriously delicious!  It's not just my favourite but the whole family's especially my son.  This dessert is made specifically for him.  I usually get a list of what he wants to eat during the week.  Now that he has a summer job, it includes his packed lunches and snacks but this is for that special treat usually enjoyed after those few days where he has to take a 2 hour bus ride home.  

Desserts doesn't have to be complicated.  They should have wholesome ingredients, quick to make and the serving just enough to satisfy that sweet craving.  This recipe is all that.  Here are the tools necessary in making this recipe:
- A high speed blender (this is a must to get that smooth consistency of the ice cream cups).
-  Silicone mini-moulds (I used these) or mini muffin liners
- Muffin tray like one of these
- Small sauce pan to melt the coconut oil and/or cacao butter.


Strawberry & Chocolate Ice Cream Cups
Ingredients:

Strawberry Layer
1/2 lb. organic strawberries, approximately 1/2 pack
+ a few more for toppings (thinly sliced)
2 c. raw cashews, soaked overnight and rinsed
1/4 c. fresh orange juice
2 Tbsp. lemon juice
1/4 c. maple syrup or raw honey
1/2 c. melted coconut oil
1/2 teaspoon vanilla essence or powder
2 Tbsp. frozen blueberries (optional and for colour balance only)

Place all ingredients in a high speed blender with the berries and all the liquid ingredients being on the bottom and the cashews on top for easier blending.  Whizz until smooth.  Adjust the taste. Line the muffin tray with the silicone moulds or muffin liners then pour the mixture into each cavity, leaving approximately 1/8" for the chocolate topping (see photo above).  Lightly bang the tray a few times into the counter so the mixture settle.  Freeze for 3 - 3/12 hours.

Chocolate Topping
1/2 c. chopped cacao butter or coconut oil
1/2 c. raw cacao powder
1/4 c. maple syrup
1/2 tsp. vanilla

A few drops of orange oil (optional)
pinch of good salt

In a small sauce pan, boil water then lower the heat.  Place all the ingredients in a small bowl and then place the bowl on top of the pan and stir until the mixture is well incorporated.  Take  out the frozen berry cups then spoon 2 - 2/12 Tbsp. of the chocolate sauce on top.  Let it set for 2-3 minutes then top with thinly sliced strawberries and other things that you may fancy like flowers or chopped nuts.   Peel off the liners, let it thaw for 8-10 mins. and serve.  Enjoy!
 

So it's Father's Day tomorrow.  I hope you will make this day a special one for the special dad in your family.  My hubby doesn't want any gifts so I decided to make him my version of homemade chocolates.  They usually give him that big smile.

For this month of June, I'm learning about the heart, my own heart specifically.  It's the perfect time to understand God's wisdom about it and see where I can change.  And as always, every time you embark on learning something, you sure get tested.  Change is not always easy but everything will all work out in the end. 

"Guard your heart above all else, for it determines the course of your life."
Proverbs 4:23, NLT

Roasted Spaghetti Squash With Arugula and Hemp Pesto

Dinner, LunchLina LiwagComment

It's the middle of winter here in Toronto.  I'm making a lot of cooked and nourishing meals to keep us warm. This weekend, my boy was home relaxing from all his busy days at the University. I thought of making something new: spaghetti squash.  He loves good food and he's my biggest critic.  I'm so happy to say that he enjoyed this recipe!

Spaghetti squash is nutritious.  It's packed with Vitamins A, B and C.  It also has beta carotene, lutein and zeaxanthin, antioxidants that promote good eye health.  Consider this as a better option than the regular pasta.

Roasted Spaghetti Squash With  Arugula and Hemp Pesto
Ingredients (preferably organic)

1 medium size spaghetti squash
1 Tbsp. avocado oil
Pinch of salt and pepper

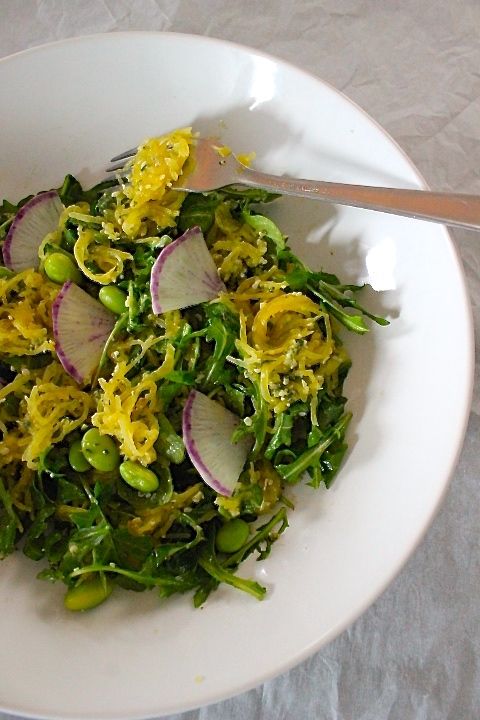
Preheat the oven to 400 degrees.  Cut the squash into half and remove the seeds.  Drizzle the oil, and season with salt and pepper.  Transfer into a roasting pan lined with parchment paper and roast, cut side down until soft, approximately 45-50 mins. depending on the size of the squash.  While roasting, prep the arugula salad and pesto.  When the squash is cooked, use a fork to scrape the flesh into long strands.   Transfer into a bowl and add some of the pesto and toss to combine.   Martha Stewart has a neat video on cooking spaghetti squash by stove top method.   Take a look here.

Arugula Salad
2-3 handful of arugula leaves
1 small purple daikon or watermelon radish, cut thinly (I used a mandolin)
1  cup frozen edamame, soaked in boiling water for 3 mins. then drained
3 Tbsp. olive oil
3 Tbsp. apple cider vinegar
3/4  tsp. stone ground mustard
1 tsp. maple syrup
Salt and pepper to taste.

Prep the salad components and mix the dressing in a small jar.  Dress the greens just before serving.

Hemp Pesto
1 1/2 c. packed basil leaves
1/2 c. hemp hearts
2 Tbsp. pine nuts (or more hemp)
1/4 c. lemon juice
3 Tbsp. olive oil
2 cloves garlic (depending on taste)
Salt and pepper to taste

Place everything in a food processor.  Pulse several times, scraping the sides.  Taste and adjust accordingly.  I was conservative in adding extra oil but feel free to add more to suit your taste.

Assembly:

In a salad bowl, combine the arugula leaves with half of the purple daikon and half of the edamame.   Add some of the dressing and toss. Adjust the taste.   To serve, use the arugula as a bed for the squash and top with the rest of the edamame and purple daikon or even more pesto.   Enjoy!

IMG_8694.jpg

If you live in a cold place like I do,  I hope you're keeping warm.   This meal is also great with a good bowl of hot soup which I've also been making.  I love this older recipe here. I can't wait to catch some sunshine somewhere warm soon!

Xoxo,

Lina 

Cauliflower & Hemp Couscous on Romaine Boats + More Culinary Training in Raw Cuisine

Lunch, Dinner, RawLina LiwagComment

It's Summer!  And what best way to celebrate the hot and sunny days than making food from fresh and local produce.  Cauliflower is not just meant for dishes like "Aloo Gobi" (which I love by the way) but can also be eaten raw!   

Cauliflower Couscous -  what is it anyway?  It's raw cauliflower processed into  "couscous-like" size by using a food processor, usually served as a salad or as a component of a salad.   It may not be too appealing to some but with the right ingredients, it actually tastes rad.  Here's one of my favourite recipes. 

Cauliflower and Hemp Couscous 0n Romaine Boats

Couscous:
1 small cauliflower, any variety (I used an orange one),
chopped (approx. 3 cups or 383 g.)
1/2 c. hemp hearts
1/3 c. parsley, roughly chopped
1/3 c. basil, cut into chiffonade
1/4 c. chives, roughly chopped
2 Tbsp. pine nuts ( or increase hemp hearts)
3 Tbsp. lemon juice
2 1/2 Tbsp. olive oil
1 Tbsp. nutritional yeast (optional, gives it a "cheesy taste") 
Salt and pepper to taste 

In a food processor, place the cauliflower and all the other ingredients except the hemp hearts.  Pulse until the mixture turns into grain-like or couscous-like size (see above photo).  Add the hemp hearts and pulse briefly.  Adjust the taste.  Leave for 30 minutes to marinate.  It even tastes better the next day.  

Romaine Boats:
A few romaine hearts (Boston bibb or butter lettuce leaves can also be used)
1 -  1 1/2 avocados, seeded, peeled and cut into cubes
1/2 c. cherry tomatoes, cut into halves or pieces
A few microgreens
Edible flowers if available
quick red onion pickles (or any pickles of choice)

Red Onion Pickles:
 medium red onion, thinly sliced
½ cup apple cider vinegar
1 cup warm water
2 tsp. maple syrup
1½ teaspoons Himalayan salt
A few peppercorns and coriander seeds

In a small bowl, combine the water, vinegar, maple syrup, salt and spices and stir to dissolve the salt and sweetener.  Place the onions in a clean mason jar and pour the liquid over.  Let it marinate for one hour to use in this recipe but overnight is better. 

Sauce: (optional but tastes great)
Tahini sauce, see the recipe here

To Assemble:
Spread the couscous on the romaine leaves.  If using the sauce, add a few dollops on over the couscous  then add the rest of the toppings.  It can also be served with greens on a salad.  Enjoy!

Basil, one of my fav herbs

Basil, one of my fav herbs

Annabelle hydrangea from our backyard

Annabelle hydrangea from our backyard

In addition to fresh produce, there's tons of lovely flowers around us these days.  I love my walks as I get to visit a mini-forest in our neighbourhood which has various wild varieties of flowers.  I hope Summer won't fly too fast!  

AN UPDATE ON MY RAW CUISINE TRAINING: 
I received my Certification in Advanced Raw Cuisine from the Matthew Kenney Culinary in April.  With this comes 270 hours of training including a Plant-based Desserts course.

 In May, I also had the opportunity to go to England and train further in Raw Cuisine with Deborah Durrant.  The program was called "Taste."   It was an intensive one week course held in the beautiful city of Bath.   Deb is a teacher that everyone would want to have: passionate, inspirational and kind hearted.  Her courses in Raw Cuisine are not just about teaching recipes but more so on practical techniques and real life application.  You can check her website here.

While in London, I also met  Amy Levin, the awesome raw chocolate guru.  I spent an afternoon with her learning about raw chocolate making.

I have such  great memories in Bath, Kent and London meeting new friends, reconnecting with relatives and childhood friends and most of all learning new things.  Below are some of the photos.  For more, please visit my Instagram page here.

Carrot Pate.  English Veggies.  Celery and Fennel Gastrique.  Balsamic Reduction.  One of my final projects in Bath, England.  Photo courtesy of Dawn Langley.

Carrot Pate.  English Veggies.  Celery and Fennel Gastrique.  Balsamic Reduction.  One of my final projects in Bath, England.  Photo courtesy of Dawn Langley.

Lavender & Citrus Ice Cream.  English Strawberries.  Berry Coulis.  Hazelnut & Ginger Crumb.  Photo by Dawn Langley.

Lavender & Citrus Ice Cream.  English Strawberries.  Berry Coulis.  Hazelnut & Ginger Crumb.  Photo by Dawn Langley.

And here are some photos that I took as a Canadian tourist.  

Bath, such a beautiful and romantic place. 

Bath, such a beautiful and romantic place. 

I hope you're enjoying your Summer!  Recently, I threw a "Mini-Raw Cafe" at home for some of my friends.  We all had a blast and enjoyed raw snacks and sweets.  I will be sharing that on my next post.   Hope to touch base soon!

Warmly,

Lina

Matcha Macadamia Latte & Homemade Nut Milks

Drink, TeaLina Liwag2 Comments


February's deep freeze in Toronto  hasn't  let up.  I'm constantly making warm drinks while thinking of places like Cali and Hawaii. Homemade lattes have been on the top of  my list lately. 

Last week, I posted this photo and recipe of coconut matcha green tea latte on my Instagram page. 

On  Saturday, a group of busy moms and working women came to our home for a Workshop.  A portion of it was spent in  making different nut milks. Making them at home,  although a bit inconvenient, is the best way to go.  They taste fresh with no preservatives, no packaging or transporting required.  All you need are the nuts, filtered water, a high speed blender and a nut milk bag.  

 Since it's another snow day, I decided to make latte again,  This time I'm using using homemade macadamia milk.  My husband enjoyed it and he also took pictures for this post.


Fun facts about matcha green tea: 

It's a high quality, bright green tea powder that’s quite expensive compared to regular green tea. This is due to the unique way of growing the tea leaves before they are stone-ground into fine  powder.  Farmers cover the plants with a shade cloth for three weeks prior to harvesting.  This process causes new shoots to grow thinner leaves with better flavour. After that, they are harvested by hand with the youngest and smallest leaves chosen for the best quality matcha.

Matcha is rich in catechins.  These are polyphenol compounds that have high antioxidant activity. The most important polyphenol in matcha is EGCG. These compounds have cancer protection properties, help prevent cardiovascular disease and slow down the aging process. . It boosts metabolism, increases energy, enhances mood and aids in better concentration. It provides Vitamins A, B-complex C, E,K and trace minerals.

Macadamia-Matcha Green Tea Latte

1 ½ cups homemade macadamia milk (see recipe below)
1  cup water
½ vanilla bean, scraped or ¼ vanilla essence or powder
1 Tbsp. organic matcha green tea (I used this brand)
1 Tbsp. coconut nectar or maple syrup (optional)

Method:

In a saucepan, heat the milk until warm but not boiled. Add the rest of the ingredients then 
whisk until frothy. If you don’t have a matcha whisk, place all the ingredients in a blender and 
blend briefly until frothy.  Serves 2.

Homemade Macadamia Milk
1 cup raw macadamia nuts, soaked overnight and rinsed
4 cups filtered water

Method:

Combine the nuts and water in a blender and blend at the highest speed for 1-2 minutes until the macadamia nuts are broken down into a fine meal and the water turns white.  Strain the pulp through a nut milk bag, cheesecloth or wire sieve. 

Suggestions:

You can also use other nuts or seeds to make your choice of non-dairy milk.  Light coconut milk like my first recipe on Instagram is also a great option.  Soak 1 cup of coconut flakes in 2 cups of water for 30 mins. to 1 hour in order to soften.  Save the water and use it to blend.  Strain in nut milk bag or wire sieve. 


Last week, there were a lot of frozen pipes in the city due to the extremely record low temperatures that we've been experiencing.  The hot water in our kitchen sink didn't work for almost 2 days and we were so scared that the pipes may burst.  Thankfully, the water finally came back after what seemed like long moments of expectation and stress at the same time.  We're also thankful that our furnace has been working very well and we are constantly warm.  

At this time, the flowers inspire us on what's ahead - Spring!  I can't wait!  

My good friend Zeny and her daughter Ayeesha brought these orchids to me this weekend.  They are so beautiful just like them.  

My friend April also took a lot of pictures on our Workshop this weekend.  In a few days, I'm hoping to share that on the blog.

Keep warm my friends!

XoXo,

Lina

Nutella & Apple Tart (Unbaked)

Dessert, Raw DessertsLina Liwag5 Comments

Hello November!   I see your signs.  The air is crisp, the days are shorter and much darker and the leaves have fallen to the ground.  Wow, I wanted to linger much longer in a much warmer and brighter October but suddenly here you are.

I tend to have more affinity to October than November or even December as I get to celebrate my wedding anniversary on the 30th of this month.  This year, it's the 21st.  Yay, I'm so thankful that my husband and I both feel joyful towards this occasion!   Two imperfect people coming together is not easy but there's hope in becoming true friends and in having a relationship that gets better over time. 

We had a simple celebration this year.  A date at one of our favourite Chinese restaurants in our area this Saturday night.  Steamed veggie dumplings, stir-fried baby bokchoy and Singapore noodles are awesome comfort foods for me - especially when it's raining.  Then there's the question on the dessert.   I sometimes try store-bought ones but personally, there's nothing like homemade dessert!   And so as always, I made one.  "Nutella Tart." Quick and easy.  No baking, no freezing and no high-speed blending required either.  Not as complicated as making a raw cheesecake.   I thought of sharing the recipe since I know there are many busy career women and moms like me who don't have a lot of time in the kitchen.

Nutella & Apple Tart

Crust:
1  1/2 cups raw almonds
6 Medjool dates, pitted
1 1/2 - 2 Tbsp. water

In a food processor, pulse the almonds and dates.  Slowly add a bit of water and continue pulsing until the mixture turns sticky.  If your dates are dry, you may have to use all the water. When ready, transfer and press into two 4.75" mini tart pans or if you don't have them, you can also use a pie pan or a bigger size tart pan.  Make sure to cover the sides as well. When done, place them in the fridge while you prepare the filling.  This photo on my Instagram page shows when the crust were just done.  

Filling:
2 cups hazelnut butter
6 Tbsp. cacao powder
4 -5 Tbsp. Maple syrup
pinch of salt
1/4 tsp. ground vanilla

In a bowl, mix the hazelnut butter, cacao powder and maple syrup until they are fully incorporated. Adjust the taste.  Take the pans out from the fridge and place the filling over the crust smoothing the top by using a spoon or for best results, an angled spatula.  Add your fruit toppings and put it back into the fridge to set for approximately 30 minutes.  It's easier to cut them this way. 

Topping:
1 small Fuji apple, cored and sliced paper thin (best by using a mandolin) or your choice of fruit.
Mix the apple with 1 Tbsp. of lemon juice.  The apples will soften with the addition of the lemon and will not be a challenge when you cut and serve the tart.

Suggestions:
This tart is great with figs or different types of berries.  See this sample of one I made on our Thanksgiving celebration.  

Here are some November images from our neighbourhood.

" Every good and perfect gift is from above, coming down from the Father of the heavenly lights, who does not change like shifting shadows." James 1:17

I'm thinking a lot about this Scripture lately.  I am humbled.  I am grateful.  My prayer is that I do not forget it or get sidetracked and take it for granted.  Happy November!

Warmly,

Lina